Blackstone Grills are an investment for any outdoor cooking enthusiast. Just like any other outdoor product, they require regular maintenance to ensure their longevity. One of the most crucial maintenance tasks is resurfacing the grill. Resurfacing not only enhances the visual appeal of the grill but also ensures its functionality remains optimal.
Grill resurfacing may sound like an intimidating task, but it’s relatively simple with the right tools and techniques at hand. In this article, I will guide you through the step-by-step process of resurfacing a Blackstone Grill, from preparing the grill to the finishing touches.
Contents
- 1 Understanding the Resurfacing Process
- 2 Choosing the Right Tools and Materials
- 3 Preparing the Grill for Resurfacing
- 4 Resurfacing the Blackstone Grill
- 5 Finishing Touches and Maintenance Tips
- 6 Enhance Your Grilling Experience
- 7 Conclusion
- 8 FAQ
- 8.1 Q: Can I use any type of cleaning agent to resurface my Blackstone Grill?
- 8.2 Q: How often should I resurface my Blackstone Grill?
- 8.3 Q: Can I use sandpaper to remove rust and stains from my Blackstone Grill?
- 8.4 Q: Do I need to season my Blackstone Grill after resurfacing?
- 8.5 Q: What types of brushes should I use for cleaning my Blackstone Grill?
- 8.6 Q: Can I resurface a Blackstone Grill that has significant damage or rust?
Key Takeaways
- Regular maintenance is crucial for a longer lifespan of Blackstone Grills.
- Resurfacing improves the grill’s aesthetic appeal and functionality.
- The resurfacing process involves cleaning, removing rust and stains, and repairing any damage.
- Choosing the right tools and materials is key for an effective resurfacing job.
- Proper finishing touches and maintenance tips can help prolong the grill’s lifespan.
Understanding the Resurfacing Process
Resurfacing a Blackstone Grill is an excellent way to restore its appearance and functionality. However, it requires a precise set of techniques and tools to be successful. In this section, I will guide you through the fundamental aspects of the resurfacing process to achieve the best results.
Cleaning the Grill Surface
The first step in resurfacing your Blackstone Grill is to clean the surface thoroughly. This involves removing any dirt, grease, or debris that may have accumulated over time. The best way to achieve this is to use a high-quality grill cleaner, such as Simple Green or Krud Kutter, in combination with a grill brush.
Before applying any cleaning agents, ensure that the grill has cooled down completely to prevent any potential injury. Apply the cleaning solution onto the grates and let it sit for around ten minutes. Use a grill brush to scrub the surface to dislodge any dirt or debris. Rinse the grill surface with water and allow it to dry completely before proceeding.
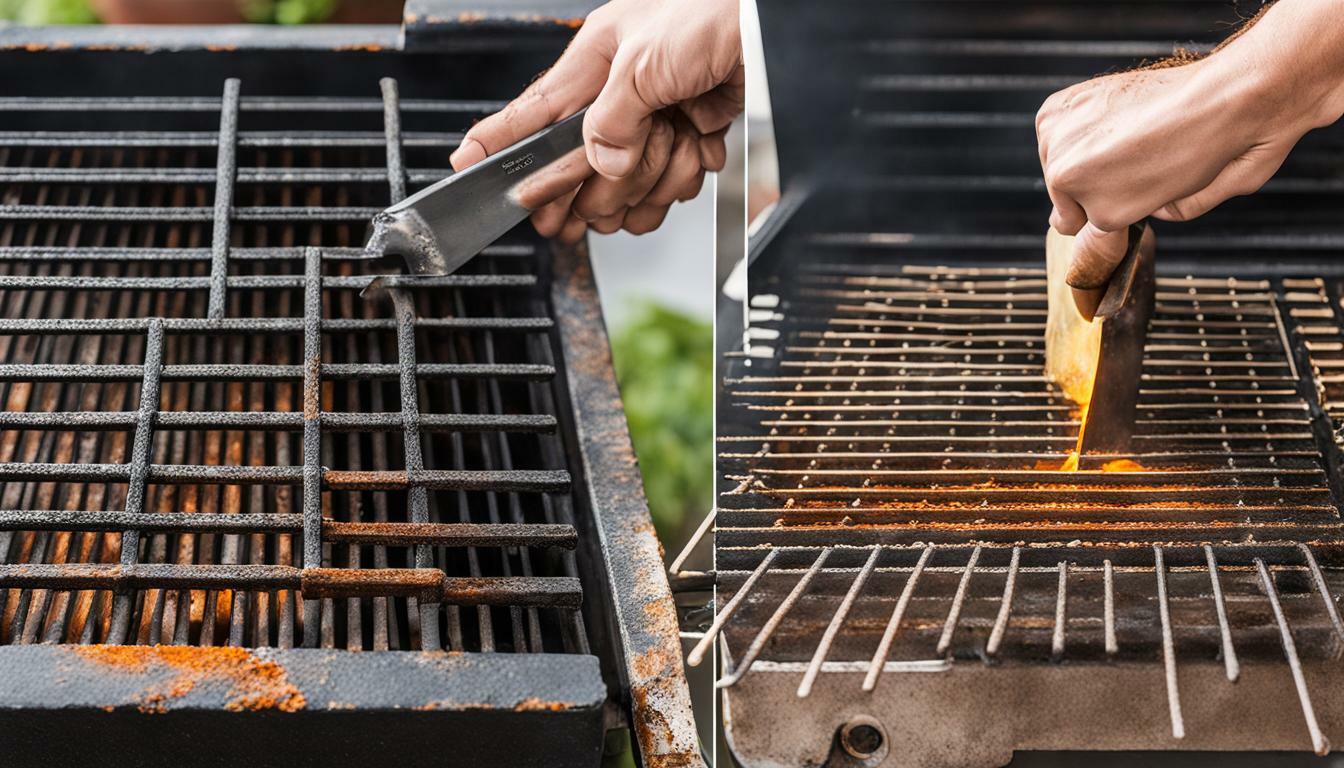
Removing Rust and Stains
Removing rust and stains is a crucial step in the resurfacing process to ensure that the grill surface is smooth and even. Depending on the severity of the rust and stains, you can use different techniques and tools for the job. One effective method is to use sandpaper or a wire brush to scrub away rust and stains manually. You can also use a power drill brush attachment to speed up the process.
For stubborn stains that cannot be removed through manual scrubbing, you can use a rust remover solution, such as CLR or Bar Keepers Friend. Apply the solution onto the affected areas and let it sit for the recommended time. Use a wire brush to scrub the surface gently. Rinse the grill surface with water and let it dry.
Repairing the Damaged Areas
If your Blackstone Grill has any damaged areas, such as cracks, holes, or chips, you can repair them with a high-temperature epoxy or putty. Apply the epoxy or putty onto the affected areas using a putty knife. Smooth out the surface and allow it to cure according to the manufacturer’s instructions. Once it has fully cured, sand the repaired areas lightly to ensure a smooth and even surface.
In conclusion, resurfacing a Blackstone Grill requires patience, attention to detail, and the right tools and materials. Cleaning the surface, removing rust and stains, and repairing any damaged areas are essential steps that ensure an optimal outcome for your grill. Follow the tips and techniques outlined in this section to achieve a fully restored Blackstone Grill that will serve you well for many years to come.
Choosing the Right Tools and Materials
When it comes to resurfacing your Blackstone Grill, choosing the right tools and materials is crucial. With the right supplies, you can achieve the best results and prolong the lifespan of your grill. Here are some tips and recommendations for selecting the right tools and materials for your grill refurbishment project.
Choosing the Best Cleaning Agents
Before you begin resurfacing your Blackstone Grill, you need to select the right cleaning agents. Using the wrong agents can damage your grill’s surface, so it’s essential to choose carefully. Look for agents specifically formulated for grills, such as degreasers and carbon removers. These cleaning agents are powerful enough to remove stubborn grime and grease without harming the grill’s surface. They typically come in spray bottles or aerosol cans, making them easy to apply.
Selecting the Right Brushes and Sandpaper
When it comes to scrubbing the grill’s surface, using the right brushes and sandpaper can make all the difference. For most grills, a wire brush with stiff bristles is the best option. This type of brush can remove caked-on grime and rust easily. You can also use sandpaper to smooth out rough spots and remove rust. Look for fine-grit sandpaper, such as 220 or higher, to avoid scratching the surface of your grill.
Choosing the Best Materials for Patching and Repairing
If your Blackstone Grill has any damaged areas, you’ll need to patch and repair those spots before resurfacing. For small areas, such as scratches and chips, a heat-resistant epoxy putty is an excellent option. This putty can withstand high temperatures and is easy to apply. For larger damaged areas, you may need to use a metal filler or replacement parts, such as grates or burners. Consult your grill’s manufacturer or a professional for guidance on the best materials and techniques for repairing larger areas.
Consider Professional Help
If you’re unsure about what materials to use or don’t feel confident in your resurfacing skills, consider seeking professional help. A grill repair or maintenance expert can guide you through the resurfacing process, recommend the best materials, and ensure that your grill is restored to optimal condition.
Conclusion
Choosing the right tools and materials is essential for resurfacing your Blackstone Grill effectively. By selecting the appropriate cleaning agents, brushes, and sandpaper, and using the right materials for patching and repairing, you can achieve excellent results and maintain the longevity of your grill. If you’re unsure about any of these steps or need further guidance, consider consulting a professional for help.
Preparing the Grill for Resurfacing
Before starting the resurfacing process, it is crucial to prepare the Blackstone Grill properly to ensure optimal results. A well-prepared grill will allow the cleaning agents to work effectively, and any repaired areas will bond properly to the surface. Below is a checklist to follow:
- Turn off the grill and make sure it has cooled down completely. This will prevent any accidents or injuries during the cleaning process.
- Remove the griddle top and scrub it thoroughly with a grill brush or scraper. Make sure all debris or grease buildup is removed.
- Take out the grease tray and wash it with warm soapy water. Let it dry completely.
- Clean the grill surface with a degreaser or cleaning agent and a scrub brush. Make sure all stains, rust, and debris are removed. Rinse the surface with water and let it dry completely.
- Inspect the grill surface for any damages or cracks. If there are any, repair them using the appropriate materials according to the manufacturer’s instructions.
- Inspect the burners and other components. If any repairs are needed, address them before beginning the resurfacing process.
- Put the griddle top back and get ready to start resurfacing the Blackstone Grill.
By following these simple steps, you can ensure that the grill is ready for resurfacing and will be in optimal condition when finished. Remember to always put safety first when handling a hot grill and to follow all manufacturer’s instructions for proper maintenance and repair.
For more grill maintenance tips and Blackstone Grill refurbishment techniques, continue reading the rest of the article.
Resurfacing the Blackstone Grill
Now that the grill has been thoroughly cleaned and prepped, it’s time to start the resurfacing process. This step-by-step guide will help you restore your Blackstone Grill to its former glory.
Step 1: Apply Cleaning Agents
Start by applying your chosen cleaning agent to the grill’s surface. You can use a degreaser or vinegar solution to break down any remaining grime and grease. Allow the solution to sit for a few minutes before scrubbing the surface with a grill brush or scouring pad. Rinse the surface with water and dry it with a clean cloth.
Step 2: Remove Rust and Stains
If the grill surface has rust or stains, it’s important to remove them before proceeding. You can use sandpaper or a wire brush to scrub away any rust or stains. Be sure to wear protective gloves to avoid injury, and use a mask to prevent inhaling any dust. Once the surface is clean, rinse it again with water and dry it with a clean cloth.
Step 3: Repair Damaged Areas
If there are any damaged areas on the grill surface, it’s important to repair them before cooking on the grill. You can use a high-heat epoxy or a cast iron patch kit to fill in any cracks or holes. Follow the manufacturer’s instructions carefully, and allow the patch to dry completely before proceeding.
With these steps complete, your Blackstone Grill has been successfully resurfaced and is ready for use. Be sure to follow the finishing touches and maintenance tips in the next section to keep your grill in top condition.
Finishing Touches and Maintenance Tips
After completing the resurfacing process, there are a few important finishing touches to ensure your Blackstone Grill remains in top condition. One important step is applying a protective coating to prevent rust and corrosion. This can be achieved by using a high-quality grill spray or oil. Simply apply the spray evenly across the grill surface and let it dry completely before use.
Another crucial step is seasoning the grill surface. This helps to condition the metal and create a natural non-stick surface for better cooking. To season the grill, simply apply a thin layer of vegetable oil to the surface and heat the grill to high for 20 to 30 minutes. Let the grill cool down before wiping off any excess oil with a cloth.
Regular maintenance is also necessary to keep your Blackstone Grill in top shape. After each use, clean the grill surface with a grill brush and warm soapy water. Be sure to remove any food debris and grease buildup, as this can damage the grill surface over time. Additionally, store the grill in a dry and covered area to prevent rust and other damage.
By following these maintenance tips, you can prolong the lifespan of your Blackstone Grill and keep it looking and performing like new for years to come.
Enhance Your Grilling Experience
Resurfacing your Blackstone Grill is about more than just restoring its appearance. It can also contribute to a better overall grilling experience. By rejuvenating your grill, you can improve heat distribution and prevent flare-ups, ensuring your food is cooked to perfection every time.
A well-maintained grill provides even cooking, allowing you to achieve those elusive grill marks and enhance the flavor of your food. By restoring your Blackstone Grill’s surface to its former glory, you can take your grilling game to the next level and impress your guests with delicious, perfectly cooked meals.
Conclusion
In conclusion, resurfacing your Blackstone Grill is an essential part of maintaining its appearance and functionality. By following the steps outlined in this article, you can ensure your grill continues to provide delicious and perfectly cooked meals for years to come. Remember to choose the right tools and materials, and to thoroughly clean and prepare the grill before resurfacing.
After completing the resurfacing process, consider applying a protective coating or seasoning the grill surface. This will ensure your grill stays in top condition and provides optimal grilling results. Don’t forget to regularly maintain your grill to prolong its lifespan and enhance your grilling experience.
In summary, resurfacing your Blackstone Grill is a simple yet effective way to rejuvenate and enhance your grilling experience. By following the tips and techniques provided in this article, you can achieve a like-new grill surface that looks and performs its best. Happy grilling!
FAQ
Q: Can I use any type of cleaning agent to resurface my Blackstone Grill?
A: It is recommended to use a cleaning agent specifically designed for grills to ensure effective cleaning without damaging the grill surface. Avoid using harsh chemicals or abrasive cleaners.
Q: How often should I resurface my Blackstone Grill?
A: The frequency of resurfacing depends on the usage and condition of your grill. It is generally recommended to resurface the grill at least once a year or as needed if you notice significant rust, stains, or damage.
Q: Can I use sandpaper to remove rust and stains from my Blackstone Grill?
A: Sandpaper can be used to remove rust and stains from the grill surface, but it is important to choose the appropriate grit. For light cleaning, a fine grit sandpaper can be used, while heavier rust or stubborn stains may require a coarser grit.
Q: Do I need to season my Blackstone Grill after resurfacing?
A: Seasoning your grill after resurfacing is recommended. This helps improve the non-stick properties of the grill surface and adds flavor to your food. Follow the manufacturer’s instructions or apply a thin layer of cooking oil and heat the grill for a few minutes before grilling.
Q: What types of brushes should I use for cleaning my Blackstone Grill?
A: Use a grill brush with stiff bristles to clean the grill surface. Brass bristle brushes are recommended as they are less likely to scratch the grill. Avoid using wire brushes, as the wire bristles can break off and potentially contaminate your food.
Q: Can I resurface a Blackstone Grill that has significant damage or rust?
A: If your grill has extensive damage or rust, it may be best to consult a professional or consider replacing the grill. Resurfacing can improve the appearance and functionality of the grill, but it may not be able to fully restore severely damaged or corroded surfaces.

- 15 Best Cordless Electric Fillet Knives for 2026 - February 13, 2026
- 15 Best Commercial Fillet Knives for 2026 - February 13, 2026
- 15 Best Cleaver Knives for Vegetables in 2026 - February 13, 2026